官方文档参考:部署 Seafile 专业版
1. 环境
准备Ubuntu18.04/16.0.4或者centos7.X 不能使用ubuntu 20或者centos 8
如果需要使用宝塔,先安装好宝塔再安装seafile
注:Ubuntu用户名别使用seafile,否则安装过程中报错:
useradd:用户“seafile”已存在2. 准备工作
- Ubuntu执行如下
apt-get update
#安装seahub依赖环境
apt-get install python2.7 python-setuptools python-mysqldb python-urllib3 python-ldap -y
#安装office预览插件
sudo apt-get install libreoffice libreoffice-script-provider-python poppler-utils
#安装字体文件
sudo apt-get install ttf-wqy-microhei ttf-wqy-zenhei xfonts-wqy- Centos执行如下
#安装seahub依赖
yum install python python-setuptools MySQL-python python-urllib3 python-ldap -y
#安装office预览插件
sudo yum install libreoffice libreoffice-headless libreoffice-pyuno poppler-utils
#安装字体文件
sudo yum install wqy-microhei-fonts wqy-zenhei-fonts wqy-unibit-fonts -y
3. 下载安装包
- ubuntu执行如下:
#创建安装目录
mkdir  /opt/seafile
#切换安装目录
cd /opt/seafile/
#下载安装镜像
wget https://yun.ittel.cn:1443/f/c9f0b0613e374f80b78d/?dl=1 -O seafile-pro-server_7.0.14_x86-64.tar.gz
#解压
tar  -zxvf  seafile-pro-server_7.0.14_x86-64.tar.gz
- Centos执行如下
#创建安装目录
mkdir  /opt/seafile
#切换安装目录
cd /opt/seafile/
#下载安装镜像
wget https://yun.ittel.cn:1443/f/e2d94241252848629e5d/?dl=1 -O seafile-pro-server_7.0.14_x86-64.tar.gz
#解压
tar  -zxvf  seafile-pro-server_7.0.14_x86-64.tar.gz
4. 执行安装命令
/opt/seafile/seafile-pro-server-7.0.14/setup-seafile-mysql.sh按照提示进行操作
Checking python on this machine ...
  Checking python module: python-mysqldb ... Done.

Checking for java ...Done.

-----------------------------------------------------------------
This script will guide you to setup your seafile server using MySQL.
Make sure you have read seafile server manual at

        https://github.com/haiwen/seafile/wiki

Press ENTER to continue  此处回车即可
-----------------------------------------------------------------
What is the name of the server? It will be displayed on the client.
3 - 15 letters or digits
[ server name ] 你的站点名称,随意填写
What is the ip or domain of the server?
For example: www.mycompany.com, 192.168.1.101
[ This server's ip or domain ] 你的域名或者本机IP
Where do you want to put your seafile data?
Please use a volume with enough free space
[ default "/opt/seafile/seafile-data" ] 默认回车
Which port do you want to use for the seafile fileserver?
[ default "8082" ] 默认回车
-------------------------------------------------------
Please choose a way to initialize seafile databases:
-------------------------------------------------------
[1] Create new ccnet/seafile/seahub databases
[2] Use existing ccnet/seafile/seahub databases
[ 1 or 2 ] 1
What is the host of mysql server?
[ default "localhost" ] 默认回车
What is the port of mysql server?
[ default "3306" ] 默认回车
What is the password of the mysql root user?
[ root password ] 输入root密码
verifying password of user root ...  done
Enter the name for mysql user of seafile. It would be created if not exists.
[ default "seafile" ] 默认回车
Enter the password for mysql user "seafile":
[ password for seafile ] 设置数据库用户seafile的密码
Enter the database name for ccnet-server:
[ default "ccnet-db" ] 默认回车
Enter the database name for seafile-server:
[ default "seafile-db" ] 默认回车
Enter the database name for seahub:
[ default "seahub-db" ] 默认回车
---------------------------------
This is your configuration
---------------------------------

    server name:            seafile
    server ip/domain:       192.168.2.81

    seafile data dir:       /opt/seafile/seafile-data
    fileserver port:        8082

    database:               create new
    ccnet database:         ccnet-db
    seafile database:       seafile-db
    seahub database:        seahub-db
    database user:          seafile


---------------------------------
Press ENTER to continue, or Ctrl-C to abort
---------------------------------
此处继续回车
Generating ccnet configuration ...

done
Successly create configuration dir /opt/seafile/ccnet.
Generating seafile configuration ...

Done.
done
Generating seahub configuration ...

----------------------------------------
Now creating ccnet database tables ...

----------------------------------------
----------------------------------------
Now creating seafile database tables ...

----------------------------------------
----------------------------------------
Now creating seahub database tables ...

----------------------------------------

creating seafile-server-latest symbolic link ...  done


-----------------------------------------------------------------
Your seafile server configuration has been finished successfully.
-----------------------------------------------------------------

run seafile server:     ./seafile.sh { start | stop | restart }
run seahub  server:     ./seahub.sh  { start  | stop | restart  }

-----------------------------------------------------------------
If you are behind a firewall, remember to allow input/output of these tcp ports:
-----------------------------------------------------------------

port of seafile fileserver:   8082
port of seahub:               8000

When problems occur, Refer to

        https://github.com/haiwen/seafile/wiki

for information.
至此安装完成
5.启动并配置管理员
- 创建启动用户(不能已root用户启动,否则搜索不能用)
#创建用户
useradd --system --comment "seafile" seafile --create-home --home-dir  /home/seafile
#修改目录权限
chown -R seafile.seafile /opt/seafile
- 启动服务
#切换seafile用户执行启动
sudo -u seafile    /opt/seafile/seafile-server-latest/seafile.sh start
# 启动seahub,会提示让你创建管理员用户,安装提示创建
sudo -u seafile    /opt/seafile/seafile-server-latest/seahub.sh start
6. 配置反向代理
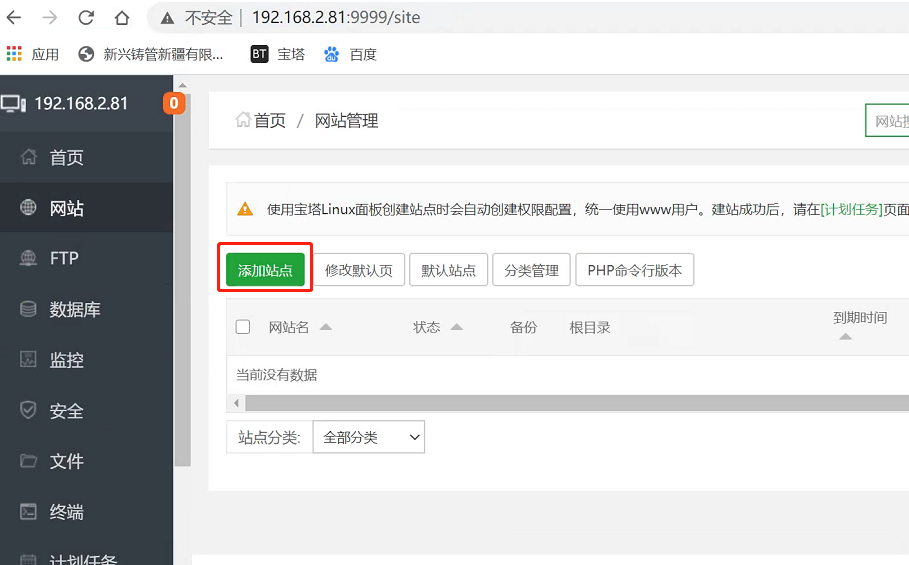
创建一个网站:
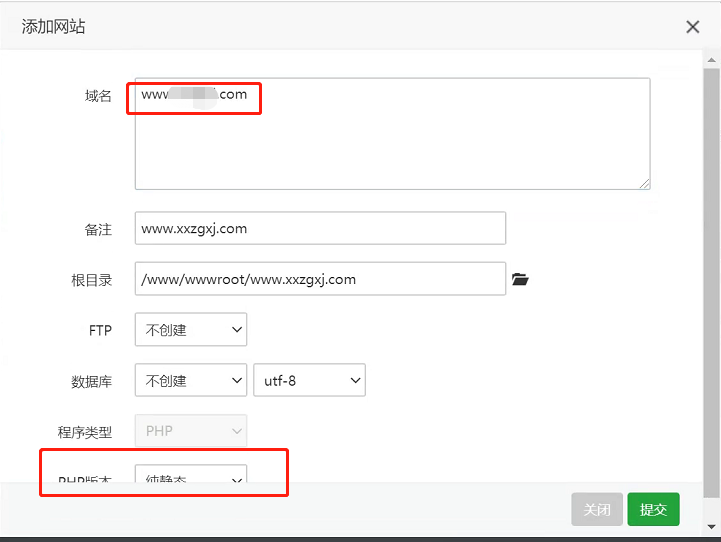
填写域名,php版本改成纯静态
打开网站配置文件
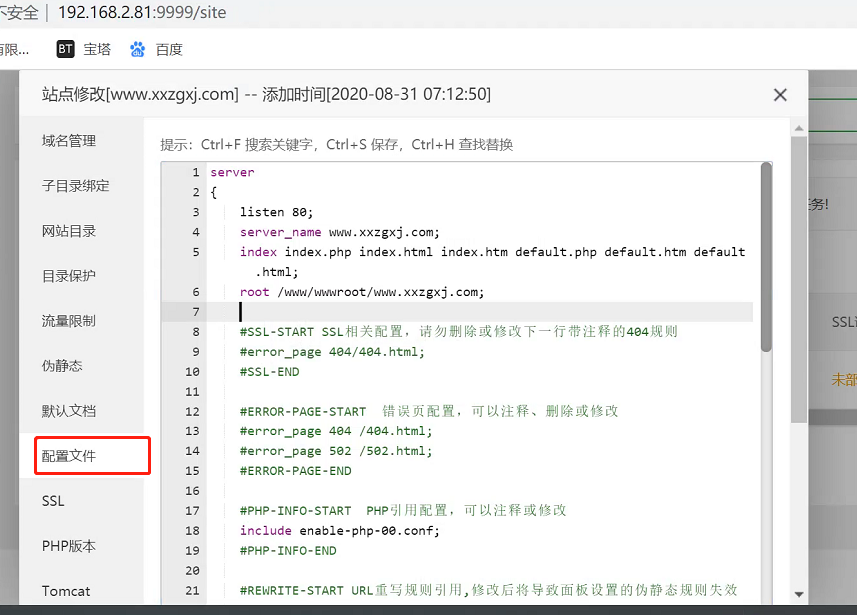
修改配置文件如下
server
{
listen 8888; #监听端口
server_name www.xxx.com; #域名
location / {
proxy_pass http://127.0.0.1:8000;
proxy_set_header Host $host; #解决CSRF verification failed
proxy_set_header X-Real-IP $remote_addr;
proxy_set_header X-Forwarded-For $proxy_add_x_forwarded_for;
proxy_set_header X-Forwarded-Host $server_name;
proxy_set_header X-Forwarded-Proto $scheme;
proxy_read_timeout 1200s;
# used for view/edit office file via Office Online Server
client_max_body_size 0;
}
location /seafhttp {
rewrite ^/seafhttp(.*)$ $1 break;
proxy_pass http://127.0.0.1:8082;
client_max_body_size 0;
proxy_set_header X-Forwarded-For $proxy_add_x_forwarded_for;
proxy_connect_timeout 36000s;
proxy_read_timeout 36000s;
proxy_send_timeout 36000s;
send_timeout 36000s;
}
location /media {
root /opt/seafile/seafile-server-latest/seahub;
}
location /seafdav {
fastcgi_pass 127.0.0.1:8080;
fastcgi_param SCRIPT_FILENAME $document_root$fastcgi_script_name;
fastcgi_param PATH_INFO $fastcgi_script_name;
fastcgi_param SERVER_PROTOCOL $server_protocol;
fastcgi_param QUERY_STRING $query_string;
fastcgi_param REQUEST_METHOD $request_method;
fastcgi_param CONTENT_TYPE $content_type;
fastcgi_param CONTENT_LENGTH $content_length;
fastcgi_param SERVER_ADDR $server_addr;
fastcgi_param SERVER_PORT $server_port;
fastcgi_param SERVER_NAME $server_name;
fastcgi_param REMOTE_ADDR $remote_addr;
client_max_body_size 0;
}
access_log /www/wwwlogs/www.xxzgxj.com.log;
error_log /www/wwwlogs/www.xxzgxj.com.error.log;
}
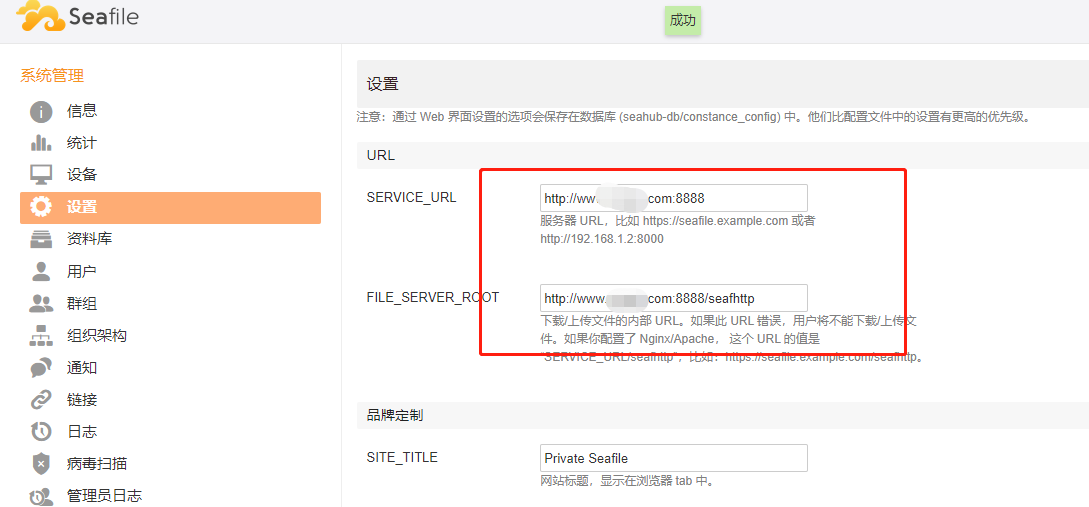
浏览器通过域名进行登录管理后台。对应修改站点url。8888是反向代理配置端口。根据实际进行修改
7. 设置开机自启
- Ubuntu设置 开机自启参照如下
vi /etc/init.d/seafile-server然后把如下复制进去,可以使用通过宝塔图形化界面编辑
#!/bin/bash
### BEGIN INIT INFO
# Provides:          seafile-server
# Required-Start:    $remote_fs $syslog mysql
# Required-Stop:     $remote_fs $syslog
# Default-Start:     2 3 4 5
# Default-Stop:      0 1 6
# Short-Description: Seafile server
# Description:       Start Seafile server
### END INIT INFO

# Author: Alexander Jackson <alexander.jackson@seafile.com.de>

# Change the value of "seafile_dir" to your path of seafile installation
#改成实际启动用户
user=seafile
#安装目录
seafile_dir=/opt/seafile
script_path=${seafile_dir}/seafile-server-latest
seafile_init_log=${seafile_dir}/logs/seafile.init.log
seahub_init_log=${seafile_dir}/logs/seahub.init.log


case "$1" in
        start)
                sudo -u ${user} ${script_path}/seafile.sh start >> ${seafile_init_log}
                sudo -u ${user} ${script_path}/seahub.sh start >> ${seahub_init_log}
        ;;
        restart)
                sudo -u ${user} ${script_path}/seafile.sh restart >> ${seafile_init_log}
                sudo -u ${user} ${script_path}/seahub.sh restart >> ${seahub_init_log}
        ;;
        stop)
                sudo -u ${user} ${script_path}/seafile.sh $1 >> ${seafile_init_log}
                sudo -u ${user} ${script_path}/seahub.sh $1 >> ${seahub_init_log}
        ;;
        *)
                echo "Usage: /etc/init.d/seafile-server {start|stop|restart}"
                exit 1
        ;;
esac
然后保存
给予执行权限并添加到开机自启
chmod +x /etc/init.d/seafile-server
update-rc.d seafile-server defaults
添加开机自启后服务手动启动和关闭命令
#停止服务
service seafile-server stop
#启动服务
service seafile-server start- Centos设置 开机自启参照如下
编辑/etc/systemd/system/seafile.service,可以使用通过宝塔图形化界面编辑
vi /etc/systemd/system/seafile.service把如下复制进去,根据实际情况调整启动用户和安装目录
[Unit]
Description=Seafile Server
#如果用的是mysql不是mariadb,则把“mariadb.service” 改成 "mysql.service"
After=network.target remote-fs.target mariadb.service

[Service]
#启动脚本目录
ExecStart=/opt/seafile/seafile-server-latest/seafile.sh start
ExecStop=/opt/seafile/seafile-server-latest/seafile.sh stop
#启动用户
User=seafile
Group=seafile
LimitNOFILE=infinity
Type=oneshot
RemainAfterExit=yes

[Install]
WantedBy=multi-user.target
再编辑/etc/systemd/system/seahub.service,可以使用通过宝塔图形化界面编辑
vi /etc/systemd/system/seahub.service把如下复制进去,根据实际情况调整启动用户和安装目录
[Unit]
Description=Seafile Seahub
After=network.target seafile.service

[Service]
ExecStart=/opt/seafile/seafile-server-latest/seahub.sh start
ExecStop=/opt/seafile/seafile-server-latest/seahub.sh stop
User=seafile
Group=seafile
Type=oneshot
RemainAfterExit=yes

[Install]
WantedBy=multi-user.target
添加到开机自启
systemctl enable seafile
systemctl enable seahub
添加开机自启后服务手动启动和关闭命令
#关闭服务
systemctl stop seafile
systemctl stop seahub
#启动服务
systemctl start seafile
systemctl start seahub
8. 安装后可选优化(可选)
a、解除预览默认限制最大2M
默认安装完成后,预览office文档和pdf最大2M,超过2M界面会提示

通过宝塔图形化界面或者命令修改 /opt/seafile/conf/seafevents.conf
添加到[OFFICE CONVERTER]的下面
## 有多少页允许在线预览。默认是20页
max-pages = 50

##文件允许的最大大小在线预览,在MB。默认值是2 MB
# #预览一个大文件(例如> 30M)网络浏览器可能会卡一会。
max-size = 10
最终效果如图

提示:如果文件大于5M,预览转换时间会很长。
更多:
onlyoffice 8.0.1 社区版去除20连接限制版(添加常用中文字体,解锁手机编辑,包含ARM64)
Centos8/Ubuntu 20安装 seafile 8.0.11/9.0.16 专业版&企业版
宝塔上面 脚本部署安装seafile 专业版8.0.11 安装步骤
 微信扫一扫打赏
 支付宝扫一扫打赏




Now creating ccnet database tables …
—————————————-
Error: Failed to connect to mysql database ccnet-db: Access denied for user ‘seafile’@’127.0.0.1’ (using password: YES)
这个是什么原因?我用打开navicat看 相关的几个数据库已经建立起来了
mysql版本不要用太高,推荐mysql 5.7
centos7配置开机自启动重启seafile、seahub提示错误
systemctl start seafile
Job for seafile.service failed because the control process exited with error code. See “systemctl status seafile.service” and “journalctl -xe” for details.
服务没有起来,看下日志
ubuntu 下面配置的自启动,总是不起作用, 服务器重启后,只能是手动执行一下 service seafile-server start, 这是什么原因?
你有没有设置开机自启
chkconfig seafile-server on配置反向代理 这里 , 把监听端口用默认80, 用IP地址可以访问, 但是无法上传和下载
如果把监听端口改为其他, 就无法访问了, 这是什么原因
后台把对应的url改成实际url,然后如果换其他端口,记得防火墙也要相应开放端口,或者直接关闭防火墙。
[…] 手动安装seafile 专业版7.0.14 安装步骤 […]